Parking Heater Installation Guide: Key Focus on Main Unit Placement & Process
A parking heater (diesel auxiliary heater or water-heated parking heater) is a popular upgrade for trucks, RVs, motorhomes, vans, and commercial vehicles. It burns diesel to generate heat, which is transferred to the vehicle’s coolant system for engine preheating, cabin warming, or defrosting — perfect for cold mornings or winter camping.
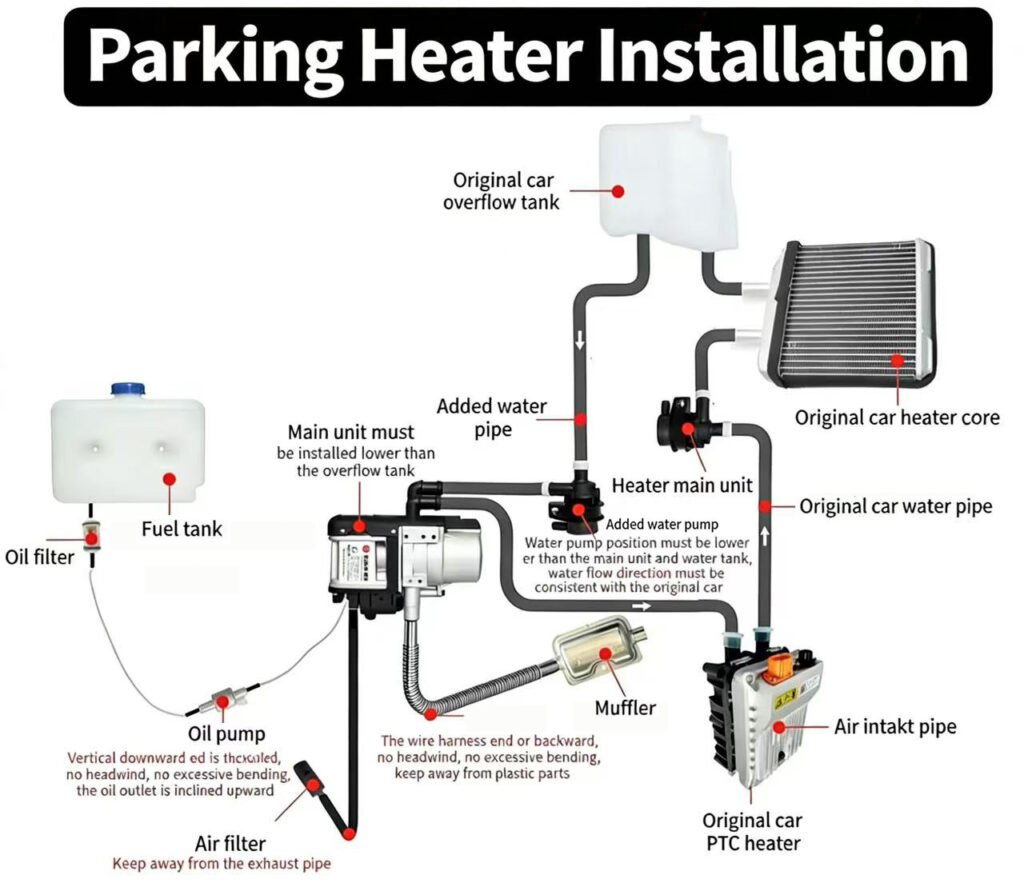
The most critical part of the entire installation is the correct placement of the main unit (heater main unit / combustion chamber + heat exchanger). Incorrect positioning is the #1 cause of poor circulation, air locks, overheating, or system failure.
1. Correct Placement of the Main Unit (Heater Main Unit)
The main unit must always be installed lower than the vehicle’s original coolant overflow/expansion tank (the white plastic reservoir usually near the radiator).
- Why this is non-negotiable The system relies partly on gravity to help coolant return to the expansion tank. If the main unit is higher than the overflow tank, coolant cannot flow back properly → air pockets form → circulation stops → local overheating or heater damage occurs.
- Recommended locations
- Under the vehicle chassis (common for trucks/RVs)
- Side of the engine bay
- Near the rear bumper or frame rail
- As close as practical to the original heater core and water pump to minimize pipe length
- Additional placement rules
- Install horizontally or with a slight downward tilt toward the exhaust side (helps drain condensate).
- Keep at least 20–30 cm clearance around the unit for heat dissipation and future maintenance.
- Avoid low spots where water/mud can accumulate (corrosion risk).
- Position away from hot exhaust components, moving parts, and plastic/fuel lines that could melt.
2. Step-by-Step Installation Process (Text Description)
Here’s a clear sequence focusing on the main unit and key connections:
Step 1: Preparation
- Disconnect the vehicle battery.
- Drain a small amount of coolant if needed to make pipe connections easier.
- Gather tools: wrenches, hose clamps, zip ties, coolant, diesel fuel filter, mounting bracket, etc.
- Check kit contents: main unit, fuel pump, added water pump, hoses, muffler, air intake pipe, wiring harness, etc.
Step 2: Mount the Main Unit
- Select a location below the overflow tank (measure heights first).
- Secure the main unit firmly using the provided bracket to prevent vibration damage.
- Orient the exhaust outlet downward or rearward (to safely vent fumes).
- Position the air intake pipe away from exhaust heat and plastic parts.
Step 3: Coolant Circuit Connection (Most Important)
- Connect in this general flow: Original overflow tank → main unit inlet → main unit outlet → added water pump → original heater core → back to original coolant pipes → overflow tank.
- Install an added water pump (circulation pump) to force coolant flow.
- Water pump must be lower than both the main unit and overflow tank.
- Water flow direction (arrow on pump) must match the original vehicle coolant direction.
- Use high-quality reinforced hoses; avoid sharp bends, kinks, or excessive length.
- Secure all connections with proper hose clamps.
Step 4: Fuel System Setup
- Run diesel line from fuel tank → fuel filter → fuel pump.
- Mount fuel pump vertically downward, with the fuel outlet inclined upward (prevents air bubbles).
- Fuel line must have no excessive bends, no headwind exposure, and stay away from hot/plastic parts.
Step 5: Exhaust & Air Intake
- Connect exhaust pipe from main unit → muffler → exit under vehicle (keep away from heat-sensitive areas).
- Attach air intake pipe from main unit → air filter → fresh air source (keep filter away from exhaust pipe).
Step 6: Electrical Connections
- Connect wiring harness: main unit → fuel pump → added water pump → controller/switch/timer.
- Route wires forward or backward (no backward bending at ends), avoid plastic/hot areas.
Step 7: Final Testing
- Refill coolant, reconnect battery.
- Start the heater and check for:
- Leaks (coolant/fuel)
- Abnormal noise/vibration
- Proper temperature rise
- No air locks (run several cycles if needed)
- Bleed air from the system if circulation seems weak.
Important Safety & Troubleshooting Tips
- Always test the first run outdoors in an open area (carbon monoxide risk).
- Follow “main unit lowest → water pump next → overflow tank highest” height rule strictly.
- If you experience poor heating or errors after installation, double-check heights and pipe routing.
- Professional installation recommended if you lack automotive experience.
Once properly installed with the main unit in the correct low position, your parking heater will deliver fast, reliable warmth even in the coldest conditions.
Feel free to contact us for model-specific advice or clarification on your vehicle setup! 🚐🔥