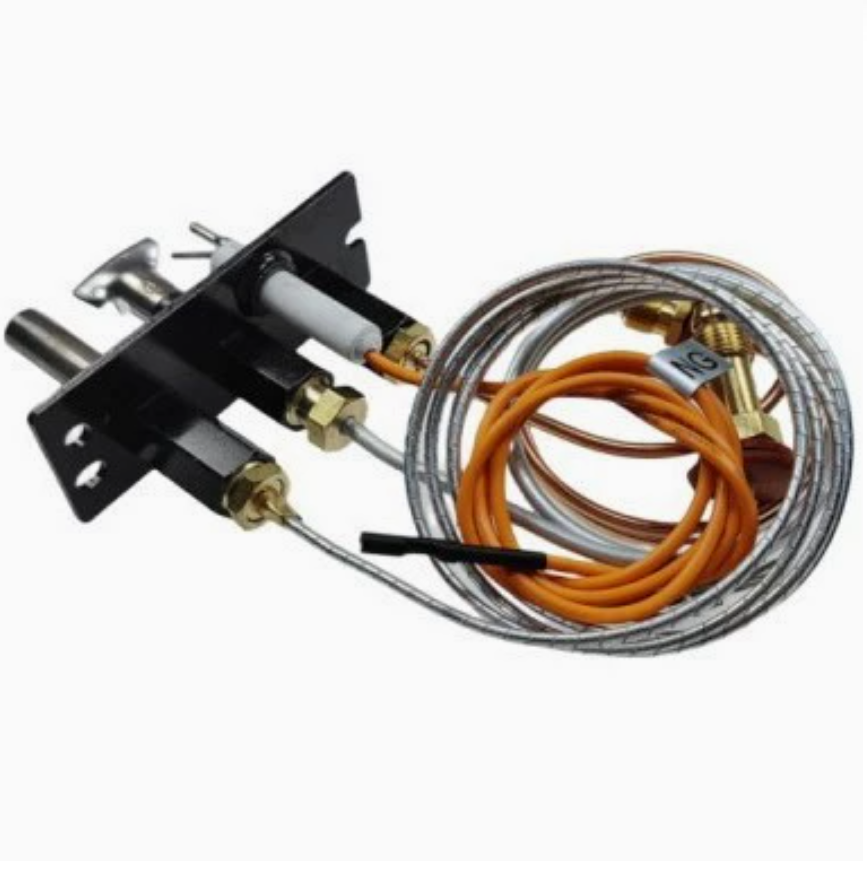
Pilot Assembly 2103-010 Natural Gas | RV Furnace & Water Heater Pilot Burner Replacement
$40.00
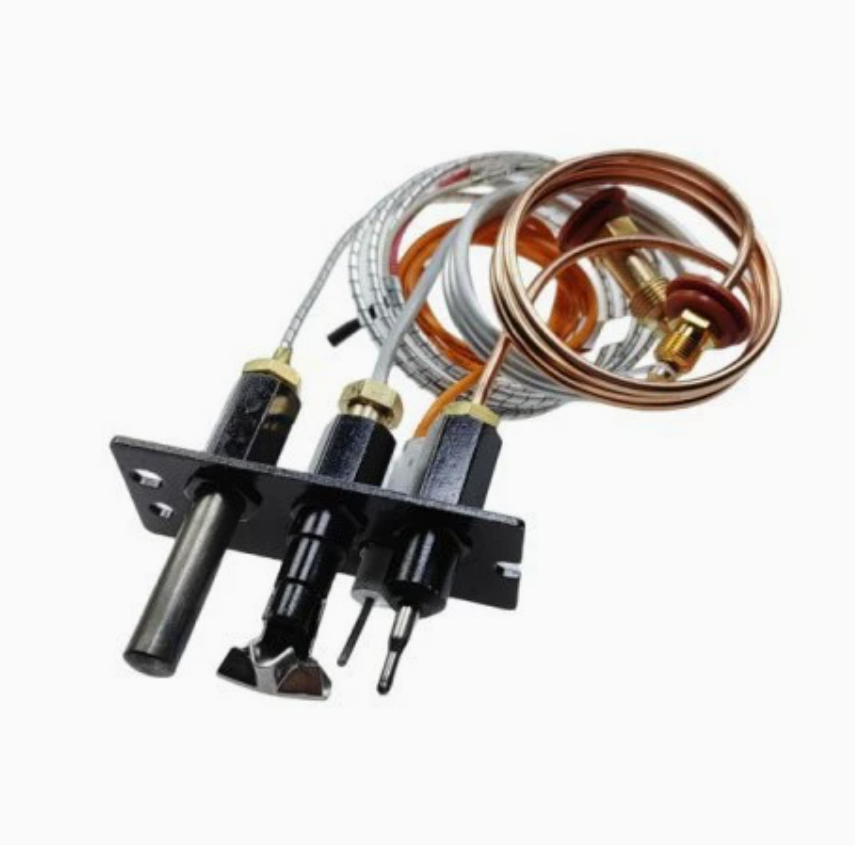
2103-010 natural gas pilot assembly for RV furnaces and water heaters with standing pilot ignition. Includes pilot burner, thermocouple, and ignition electrode. Direct replacement for Atwood, Suburban, Dometic systems. Reliable flame sensing, easy install. Free shipping worldwide.
Free shipping on orders over $60! Delivery time: 7-12 days
- Satisfaction Guaranteed
- No Hassle Refunds
- Secure Payments
Pilot Assembly 2103-010 Natural Gas – RV Furnace & Water Heater Pilot Burner Replacement
The pilot assembly is the ignition component for RV furnaces and water heaters that use a standing pilot light system (as opposed to electronic spark ignition). It consists of the pilot burner (small gas flame), the thermocouple (senses the pilot flame and keeps the gas valve open), and the ignition electrode (for manual or electronic ignition of the pilot). A faulty pilot assembly can cause the pilot light to go out repeatedly, the main burner to not ignite, or gas leaks.
This 2103-010 natural gas pilot assembly is designed as a direct replacement for RV furnaces and water heaters with standing pilot ignition. It includes the pilot burner, thermocouple, and ignition electrode in a complete assembly for easy installation.
Compatibility
- Atwood Hydro Flame furnaces with standing pilot: 85-III, 89-II, 7900-I series (older models)
- Atwood water heaters with standing pilot: G6A-6E, G6A-7E, GC6AA-7E (older models)
- Suburban furnaces with standing pilot: SF-20, SF-25, SF-30 (older models)
- Suburban water heaters with standing pilot: SW6P, SW10P (older models)
- Dometic/ Duo Therm furnaces with standing pilot (older models)
- Replaces part numbers: 2103-010, 2103-011, 160922, 070421
- Most older RV furnaces and water heaters with natural gas / propane standing pilot
Kit Contents
- Pilot Burner — small gas burner with air shutter adjustment
- Thermocouple — flame sensor that generates millivoltage to hold the gas valve open
- Ignition Electrode — spark electrode for pilot ignition (if equipped)
- Mounting Bracket — for securing the pilot assembly to the burner
- Installation Instructions — step-by-step guide
Specifications
| Parameter | Specification |
|---|---|
| Part Number | 2103-010 (replaces 2103-011, 160922) |
| Gas Type | Natural Gas (convertible to LP/Propane with orifice change) |
| Pilot Type | Standing pilot (continuous flame) |
| Thermocouple | Type K, 36″ lead, generates 25-35 mV when heated |
| Thermocouple Connection | 1/4″ NPT nut (standard gas valve connection) |
| Pilot Orifice | #54 drill size (natural gas) |
| Ignition | Manual match light or electronic spark (depending on model) |
| Mounting | Bracket mounted to main burner assembly |
| Material | Stainless steel burner, brass fittings, ceramic insulator |
| Operating Temp | Pilot flame: ~1800°F (980°C) at tip |
| Certification | CSA, AGA, CE, RoHS |
How It Works
In a standing pilot system, a small gas flame (the pilot) burns continuously. When the thermostat calls for heat, the main gas valve opens, and the pilot flame ignites the main burner. The thermocouple, which is heated by the pilot flame, generates a small electrical voltage (25-35 millivolts) that holds the gas valve’s safety magnet open. If the pilot flame goes out (due to wind, draft, or gas interruption), the thermocouple cools, the voltage drops, and the safety magnet closes the gas valve, preventing unburned gas from escaping. This is a critical safety feature — the gas valve will not open unless the pilot is lit and the thermocouple is generating sufficient voltage.
Installation Guide
- Safety first: Turn off the gas supply at the tank or manual shutoff valve. Disconnect 12V power if the unit has electronic ignition. Allow the furnace/water heater to cool completely. Work in a well-ventilated area.
- Access the pilot: Remove the exterior access panel. The pilot assembly is mounted near the main burner, visible through the access panel. You may need to remove the burner assembly for easier access.
- Disconnect the thermocouple: Use a 7/16″ wrench to unscrew the thermocouple nut from the gas valve. Gently pull the thermocouple lead out of the valve.
- Disconnect the pilot gas line: Use a 3/8″ or 7/16″ wrench to disconnect the pilot gas supply tube from the gas valve or pilot orifice. Use two wrenches to avoid twisting the line.
- Disconnect ignition wire: If equipped with electronic ignition, disconnect the ignition electrode wire from the ignition module.
- Remove old pilot assembly: Unscrew the mounting screws holding the pilot bracket to the burner assembly. Carefully remove the old pilot assembly, noting its position and orientation relative to the main burner.
- Install new pilot assembly: Position the new 2103-010 pilot assembly in the same location as the old one. The pilot flame tip should be positioned 1/4″ to 3/8″ from the main burner’s gas outlet, and the thermocouple tip should be in the upper 1/3 of the pilot flame. Secure with the mounting screws.
- Reconnect pilot gas line: Connect the pilot gas supply tube to the gas valve or pilot orifice. Use gas-rated Teflon tape on threaded connections. Tighten with two wrenches.
- Reconnect thermocouple: Insert the thermocouple into the gas valve’s thermocouple port. Hand-tighten the nut, then tighten an additional 1/4 turn with a wrench. Do not over-tighten — this can damage the thermocouple or valve.
- Reconnect ignition wire: If equipped, connect the ignition electrode wire to the ignition module.
- Bleed and test for leaks: Turn on the gas supply slowly. Apply soapy water to all gas connections (gas valve, pilot line, thermocouple). Check for bubbles — any bubbling indicates a leak. If you find a leak, turn off the gas, tighten the connection, and retest. NEVER use a flame to check for gas leaks!
- Light the pilot: Follow the manufacturer’s instructions for lighting the pilot: (1) Turn the gas valve knob to “PILOT”. (2) Press and hold the knob down. (3) Light the pilot with a match or electronic igniter. (4) Continue holding the knob for 30-60 seconds to allow the thermocouple to heat up. (5) Release the knob — the pilot should stay lit. If it goes out, repeat the process, holding the knob longer. If it won’t stay lit after several attempts, check the thermocouple position and connection.
- Test main burner: Once the pilot is lit and stays lit, turn the gas valve knob to “ON”. Set the thermostat to call for heat. Verify the main burner ignites from the pilot flame within 5 seconds. Check the main burner flame — it should be blue with yellow tips, not yellow or sooty. Adjust the air shutter on the main burner if needed. Let the unit run through at least one complete heating cycle.
Common Symptoms of a Bad Pilot Assembly
- Pilot light won’t stay lit (goes out when you release the knob)
- Pilot flame is weak, yellow, or lifting off the burner
- Main burner won’t ignite even though the pilot is lit
- Thermocouple generates insufficient voltage (less than 20 mV)
- Pilot orifice is clogged (small flame or no flame)
- Thermocouple tip is not in the pilot flame (incorrect position)
- Gas smell near the pilot assembly (leaking fittings or cracked tube)
- Pilot flame blows out easily (improper air shutter adjustment or draft)
- Soot buildup on the pilot burner or thermocouple (incomplete combustion)
- Thermocouple nut is loose or cross-threaded at the gas valve
Pilot Flame Adjustment
A proper pilot flame should be:
- Color: Blue with a slight yellow tip (not all yellow, which indicates insufficient air)
- Size: 1-2 inches long (not too small — won’t heat the thermocouple or ignite the main burner; not too large — wastes gas and can overheat components)
- Position: The thermocouple tip should be in the upper 1/3 of the flame (the hottest part). The main burner gas outlet should be 1/4″ to 3/8″ from the pilot flame tip.
- Stability: The flame should not lift off the burner or blow out in normal drafts. If it does, adjust the air shutter (small screw on the pilot burner) to reduce air intake.
To adjust the pilot flame size: (1) Locate the pilot adjustment screw on the gas valve (usually under a small cap). (2) Turn the screw clockwise to reduce the flame, counterclockwise to increase it. (3) Make small adjustments (1/8 turn at a time) and wait a few seconds for the flame to stabilize. (4) Aim for a 1-2 inch blue flame that fully envelopes the thermocouple tip.
Frequently Asked Questions
Q: Why won’t my pilot light stay lit?
A: The most common causes are: (1) Bad thermocouple: If the thermocouple is worn, damaged, or not generating enough voltage (25-35 mV required), the gas valve’s safety magnet won’t stay open. Test the thermocouple with a millivolt meter — if it reads less than 20 mV when heated, replace it. (2) Incorrect thermocouple position: The thermocouple tip must be in the upper 1/3 of the pilot flame. If it’s too high, too low, or not in the flame at all, it won’t heat up properly. Adjust the pilot bracket position. (3) Weak pilot flame: A clogged pilot orifice or low gas pressure can produce a weak flame that doesn’t heat the thermocouple sufficiently. Clean the orifice with a small wire or compressed air. Check the gas pressure. (4) Draft or wind: A strong draft can blow out the pilot. Check for drafts around the access panel or exhaust. Install a draft hood or wind guard if needed. (5) Bad gas valve: If the thermocouple is good and properly positioned but the pilot still won’t stay lit, the gas valve’s safety magnet may be weak. The gas valve may need replacement.
Q: Can I convert this natural gas pilot to propane (LP)?
A: Yes, but it requires changing the pilot orifice. Natural gas and propane have different energy content and require different orifice sizes. This 2103-010 assembly comes with a natural gas orifice (#54 drill size). To convert to propane, you need to install a smaller propane orifice (#58-#60 drill size, depending on the specific model). The orifice is usually a small brass fitting that screws into the pilot burner. You can purchase a conversion orifice separately. We do not recommend drilling the orifice yourself — use a properly sized factory orifice. After conversion, adjust the air shutter for a proper blue flame. Always verify the gas type rating on the unit’s data plate before converting. If you’re unsure, contact a qualified gas technician.
Q: How do I clean a clogged pilot orifice?
A: A clogged pilot orifice can cause a weak or nonexistent pilot flame. To clean it: (1) Turn off the gas supply and allow the unit to cool. (2) Remove the pilot assembly from the burner. (3) Locate the pilot orifice — it’s a small brass fitting with a tiny hole where gas exits. (4) Use a very small wire (like a guitar string or paper clip) to gently clear the orifice hole. Do NOT use a drill bit or anything that could enlarge the hole — this will change the gas flow and cause an improper flame. (5) Blow compressed air through the orifice to remove any loose debris. (6) Reinstall the pilot assembly and test the flame. If the orifice is still clogged after cleaning, or if the hole is damaged, replace the orifice or the entire pilot assembly. Never operate with an enlarged or damaged orifice — this can cause excessive gas flow and dangerous operating conditions.
Q: How long should a thermocouple last?
A: Under normal use, a thermocouple typically lasts 3-5 years. However, it can fail earlier due to: (1) Corrosion from moisture or condensation, (2) Physical damage from vibration or impact, (3) Fatigue from repeated heating/cooling cycles, (4) Improper positioning (too hot or too cold reduces lifespan), (5) Loose or corroded connection at the gas valve. We recommend inspecting the thermocouple annually as part of your furnace/water heater maintenance. If you notice the pilot going out frequently, or the thermocouple reads less than 20 mV when heated, replace it. Thermocouples are inexpensive and easy to replace — keeping a spare on hand is a good idea for RVers.
Related Products
- Suburban Ignition Electrode (232286) — Replacement spark probe for electronic ignition systems
- FAN 50 PLUS Ignitor Board — Universal 12V electronic ignition board
- RV Gas Water Heater Solenoid Valve — 12V gas control valve for water heaters
Need help with your standing pilot furnace or water heater? Contact our technical team with your model number and symptoms. Free shipping and duties included on all orders.
You must be logged in to post a review.


Reviews
There are no reviews yet.