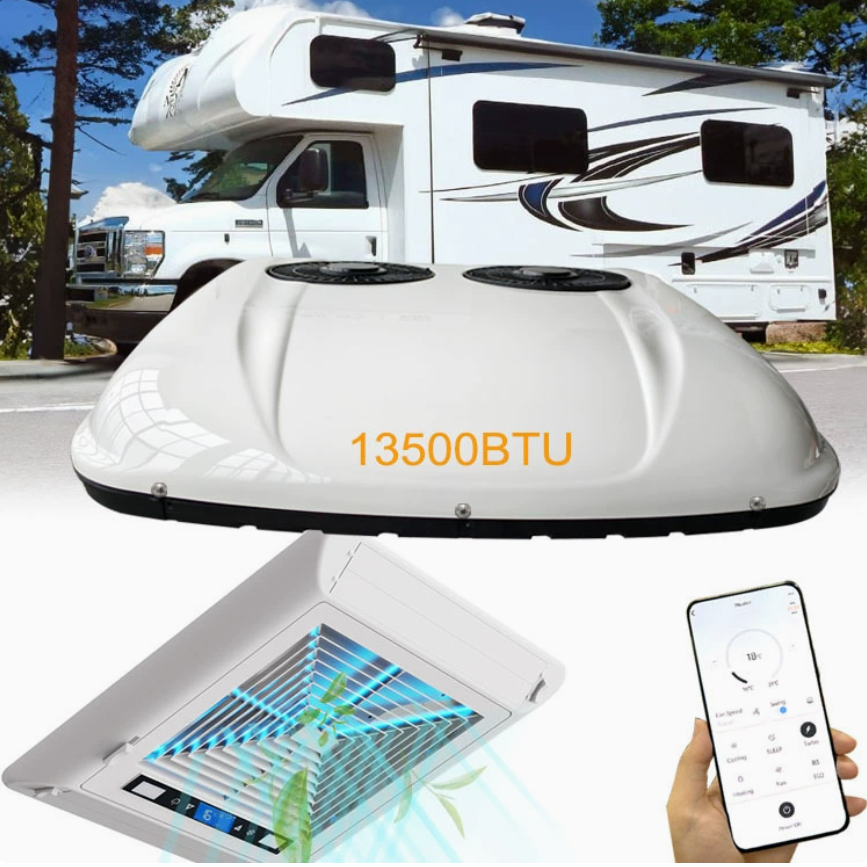
12V 13500 BTU Rooftop RV Air Conditioner Heat Pump | Cooling & Heating for Camper Van
$500.00
12V DC 13,500 BTU rooftop RV air conditioner with heat pump for both cooling and heating. Energy-efficient DC compressor, low power draw, ideal for off-grid RVs, camper vans, and boats. Rooftop mounting, ducted or non-ducted, quiet operation. Free shipping worldwide.
Free shipping on orders over $60! Delivery time: 7-12 days
- Satisfaction Guaranteed
- No Hassle Refunds
- Secure Payments
12V 13500 BTU Rooftop RV Air Conditioner Heat Pump – Cooling & Heating for Camper Van
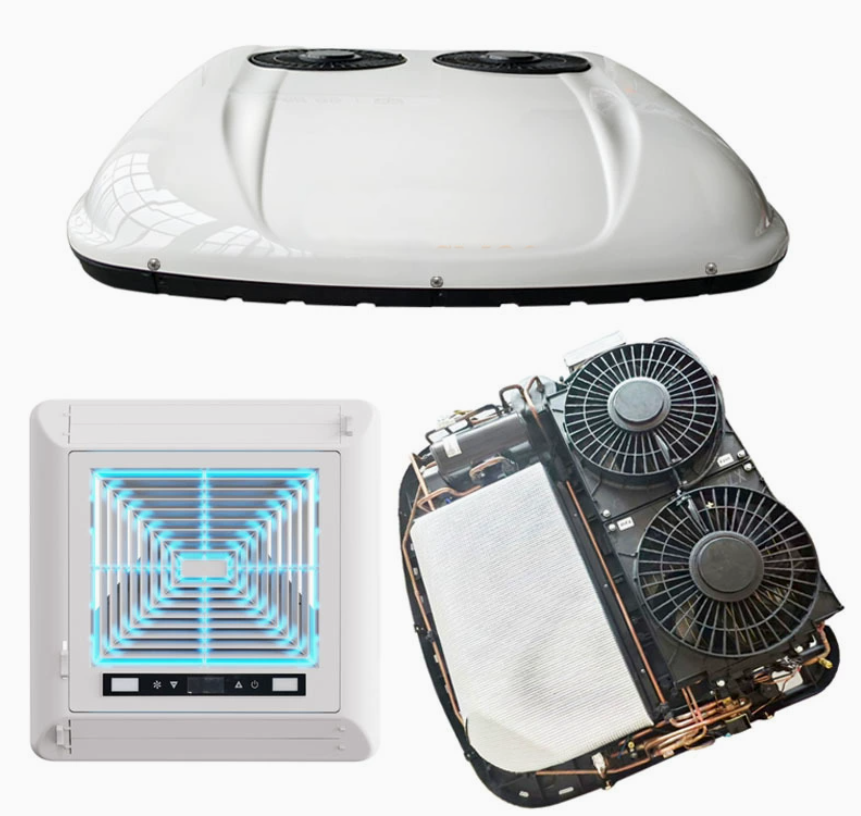
This 12V DC powered 13,500 BTU rooftop RV air conditioner with heat pump provides both cooling and heating for your RV, camper van, motorhome, or boat. Unlike traditional 120V AC rooftop AC units that require shore power or a generator, this unit runs directly on 12V DC power, making it ideal for off-grid camping, boondocking, and installations where 120V power is limited or unavailable. The efficient DC compressor and variable-speed fan minimize power consumption while maximizing cooling and heating performance.
The heat pump function reverses the refrigeration cycle to provide heating in cool weather, making this a versatile year-round climate control solution. With a 13,500 BTU cooling capacity and 11,000 BTU heating capacity, it can comfortably cool or heat spaces up to 300-400 square feet, suitable for most class B, class C, and small class A motorhomes, as well as camper vans and converted vans.
Key Features
- 12V DC Powered: Runs directly on 12V DC battery power — no inverter, shore power, or generator required. Perfect for off-grid and boondocking.
- 13,500 BTU Cooling: Powerful cooling capacity for hot summer days, suitable for RVs up to 300-400 sq ft.
- Heat Pump Heating: Reversible cycle provides 11,000 BTU of heating for cool mornings and evenings — no separate furnace needed for mild weather.
- Energy Efficient: DC variable-speed compressor and brushless DC fan motor minimize power consumption. Typical draw: 40-80A at 12V (depending on load).
- Rooftop Mounting: Standard 14″ × 14″ rooftop opening (fits most RV roof vents). Low-profile aerodynamic design reduces wind resistance and noise.
- Ducted or Non-Ducted: Compatible with both ducted (through ceiling ducts) and non-ducted (direct discharge) ceiling assemblies.
- Quiet Operation: Variable-speed compressor and insulated compressor compartment reduce noise. Typical noise level: 55-65 dB.
- Smart Controls: Digital thermostat with temperature display, mode selection (cool, heat, fan, auto), fan speed control, and timer function. Optional WiFi/Bluetooth control available.
- Multiple Safety Features: Overcurrent protection, overheat protection, low-voltage cutoff, anti-freeze protection, and compressor delay protection.
- All-Weather Operation: Cooling in temperatures up to 120°F (49°C); heating in temperatures down to 32°F (0°C) (heat pump efficiency decreases below 40°F).
Specifications
| Parameter | Specification |
|---|---|
| Cooling Capacity | 13,500 BTU/hr (4.0 kW) |
| Heating Capacity | 11,000 BTU/hr (3.2 kW) — heat pump mode |
| Power Supply | 12V DC (10.5-15V operating range) |
| Cooling Power Draw | 40-80A @ 12V (500-960W) depending on load and ambient temp |
| Heating Power Draw | 35-70A @ 12V (420-840W) depending on load and ambient temp |
| Fan Power Draw | 2-8A @ 12V (24-96W) depending on speed |
| Compressor Type | DC variable-speed rotary compressor (brushless) |
| Refrigerant | R-134a (ozone-safe, environmentally friendly) |
| Fan Speeds | 3 speeds (Low, Medium, High) + Auto |
| Airflow | ~300 CFM (cubic feet per minute) at high speed |
| Temperature Range | Cooling: 60-90°F (16-32°C); Heating: 60-80°F (16-27°C) |
| Operating Temp (Cooling) | 60-120°F (16-49°C) ambient |
| Operating Temp (Heating) | 32-80°F (0-27°C) ambient |
| Noise Level | 55-65 dB (indoor), 65-75 dB (outdoor) |
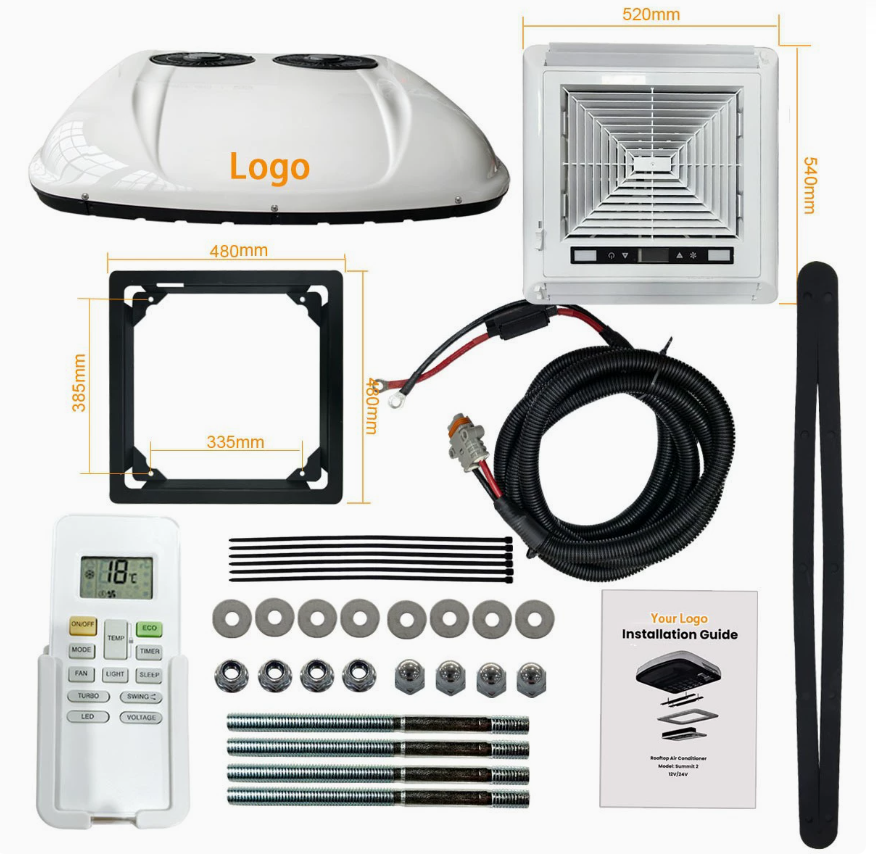
| Roof Opening | Standard 14″ × 14″ (356 × 356mm) RV roof vent |
| Dimensions (Rooftop Unit) | ~30″ × 28″ × 12″ (762 × 711 × 305mm) |
| Dimensions (Ceiling Assembly) | ~16″ × 16″ × 4″ (406 × 406 × 102mm) |
| Weight | ~75 lbs (34 kg) rooftop unit; ~8 lbs (3.6 kg) ceiling assembly |
| Mounting | 4-bolt mounting through roof opening (hardware included) |
| Drain | Condensate drain pan with 3/8″ drain tube connection |
| Certification | CE, RoHS, E-mark, FCC |
Installation Guide
- Choose the location: Select a 14″ × 14″ roof opening (existing vent or new cutout) that is: (a) Centrally located in the living area for even air distribution, (b) At least 6″ from any roof edge, vent, or antenna, (c) Not in a high-foot-traffic area on the roof, (d) Accessible from inside for the ceiling assembly and wiring. Ensure the roof can support the 75 lb weight — reinforce if necessary.
- Prepare the roof opening: If using an existing roof vent, remove the vent and clean the opening. If cutting a new opening, mark a 14″ × 14″ square, drill pilot holes at the corners, and cut with a jigsaw or reciprocating saw. Remove any insulation or debris. File down any sharp edges. Apply a rust inhibitor to bare metal edges if cutting through a metal roof.
- Install the gasket: Apply the included foam gasket to the bottom flange of the rooftop unit. Ensure the gasket is continuous and properly seated — this creates a watertight seal between the unit and the roof. Do not use silicone sealant with the gasket (the gasket is designed to compress and seal on its own).
- Mount the rooftop unit: With at least two people, lift the 75 lb rooftop unit onto the roof and position it over the opening. Align the mounting holes with the opening. Lower the unit carefully, ensuring the gasket compresses evenly. From inside the RV, install the 4 mounting bolts through the ceiling plate and tighten them in a crisscross pattern (like tightening lug nuts) to ensure even compression of the gasket. Do not over-tighten — this can crack the roof or distort the unit.
- Connect the condensate drain: Attach the 3/8″ drain tube to the drain pan outlet on the rooftop unit. Route the drain tube to the edge of the roof or to a designated drain location. Ensure the drain tube has a downward slope so condensate can flow freely. Do not route the drain tube over doors, windows, or walkways.
- Install the ceiling assembly: From inside the RV, connect the wiring harness between the rooftop unit and the ceiling assembly (the harness passes through the roof opening). Mount the ceiling assembly to the 4 mounting bolts. Ensure the air discharge louvers are properly positioned (for non-ducted) or the duct adapters are connected (for ducted systems). Secure the ceiling assembly with the included trim ring.
- Connect 12V power: Run a dedicated 12V DC power line from the battery bank to the air conditioner. Use appropriate wire gauge based on the run length and maximum current draw (80A):
- 0-10 ft: 4 AWG
- 10-20 ft: 2 AWG
- 20-30 ft: 1 AWG
- 30-40 ft: 1/0 AWG
Install a 100A circuit breaker or fuse within 12″ of the battery positive terminal. Connect the positive wire to the breaker, then to the AC unit. Connect the negative wire directly to the battery negative terminal or chassis ground. Ensure all connections are tight and properly insulated. We strongly recommend using a battery monitor to track state of charge when running the AC.
- Install the thermostat: Mount the digital thermostat in a convenient location on an interior wall, away from direct sunlight, heat sources, and drafts. Connect the thermostat wiring to the ceiling assembly (low-voltage signal wires, typically 4-6 wires). Follow the wiring diagram included with the unit.
- Test operation: Before testing, ensure the battery bank is fully charged (12.6V or higher). Turn on the 12V power to the AC unit. Set the thermostat to COOL mode, lower the temperature setting, and select a fan speed. Verify:
- The indoor fan starts (you should hear air movement)
- The compressor starts after a 30-second delay (you’ll hear a low hum from the rooftop unit)
- Cool air is discharged from the vents (should feel noticeably cooler within 2-3 minutes)
- Condensate drains from the drain tube (after 5-10 minutes of operation)
- The unit cycles off when the set temperature is reached
Then test HEAT mode: Set the thermostat to HEAT, raise the temperature, and verify warm air is discharged. Test all fan speeds and modes. Monitor the battery voltage during operation — it should not drop below 11.5V under load. If voltage drops excessively, check wire gauge and connections, or consider upgrading your battery bank.
- Seal the roof: Once the unit is tested and working, apply a bead of Dicor self-leveling lap sealant (or equivalent RV roof sealant) around the entire perimeter of the rooftop unit flange, covering the mounting bolts and gasket edge. This provides an additional layer of waterproofing. Smooth the sealant with a gloved finger or plastic tool. Allow the sealant to cure for 24-48 hours before exposing to rain or washing the roof.
Power System Requirements
This 12V DC air conditioner requires a robust electrical system to operate effectively. Here are the recommended minimum requirements:
- Battery Bank: Minimum 200Ah of lithium (LiFePO4) battery capacity, or 400Ah of lead-acid/AGM. Lithium is strongly recommended due to its higher discharge rate capability and usable capacity. A 200Ah lithium battery can run the AC for approximately 2-4 hours (depending on load and ambient temperature).
- Solar Power: Minimum 400W of solar panels to recharge the batteries during the day. For all-day AC operation, 600-800W of solar is recommended (depending on sunlight conditions).
- DC-DC Charger: If charging from the vehicle alternator while driving, install a 30-50A DC-DC charger to recharge the house batteries.
- Inverter: Not required for this AC unit (it runs directly on 12V DC). However, you may need an inverter for other 120V appliances.
- Wire Gauge: Use the appropriate wire gauge based on run length (see installation guide). Undersized wires cause voltage drop, reduced performance, and potential fire hazards.
- Circuit Breaker: 100A DC circuit breaker or fuse within 12″ of the battery positive terminal.
- Battery Monitor: Strongly recommended to track battery state of charge and prevent over-discharging.
Maintenance Tips
- Clean the air filter: The ceiling assembly has a washable mesh air filter. Clean it every 2-4 weeks of use (more often in dusty environments). Remove the filter, rinse with water, let it dry completely, and reinstall. A clogged filter reduces airflow and cooling efficiency.
- Inspect the rooftop unit: Every 3-6 months, inspect the rooftop unit for: (a) Debris on the condenser coil (leaves, dirt, insects), (b) Damage to the shroud or housing, (c) Proper sealant around the flange (cracks or gaps), (d) Clear condensate drain tube. Clean the condenser coil with a soft brush or low-pressure compressed air — do not use high-pressure water, which can damage the fins.
- Check refrigerant level: The unit is sealed and should not require refrigerant recharging under normal use. If cooling performance declines significantly, have a qualified HVAC technician check the refrigerant level and inspect for leaks. Do not attempt to recharge the refrigerant yourself — this requires specialized equipment and certification.
- Inspect wiring: Annually, inspect all 12V DC wiring connections for corrosion, looseness, or fraying. Tighten or replace as needed. Check the circuit breaker for proper operation. Ensure the battery terminals are clean and tight.
- Clean the condenser coil: Annually (or as needed), clean the outdoor condenser coil with a commercial HVAC coil cleaner or mild detergent and water. Spray the cleaner on the coil, let it sit for 5-10 minutes, then rinse with low-pressure water from the inside out. This improves heat transfer and cooling efficiency.
- Winter storage: Before storing the RV for the winter, clean the air filter and condenser coil, inspect the roof sealant, and cover the rooftop unit with a protective AC cover (breathable fabric, not plastic). Ensure the condensate drain tube is clear and drained. Disconnect 12V power to the AC unit.
- Replace every 8-12 years: Under normal RV use, a rooftop AC unit typically lasts 8-12 years. If you notice declining performance, increasing noise, refrigerant leaks, or compressor failure, it may be more cost-effective to replace the entire unit rather than repair it.
Frequently Asked Questions
Q: How long can I run this AC on my battery bank?
A: The runtime depends on your battery capacity, the ambient temperature, the set temperature, and the AC load. Here are approximate runtimes for a fully charged battery bank:
- 100Ah lithium (LiFePO4): ~1-2 hours
- 200Ah lithium: ~2-4 hours
- 300Ah lithium: ~3-6 hours
- 400Ah lithium: ~4-8 hours
- 200Ah AGM/lead-acid: ~1-2 hours (only 50% usable)
- 400Ah AGM/lead-acid: ~2-4 hours (only 50% usable)
These are estimates for moderate cooling (80-90°F ambient, 72°F set point). In extreme heat (100°F+), the compressor will run more frequently and runtime will be shorter. With 400-600W of solar panels, you can extend the runtime significantly during daylight hours by offsetting the AC’s power consumption. For all-day off-grid AC, we recommend a minimum of 400Ah lithium + 600W solar.
Q: What’s the difference between 12V DC and 120V AC rooftop air conditioners?
A: 120V AC units are the traditional RV rooftop AC. They run on 120V alternating current, which requires shore power, a generator, or an inverter (to convert 12V DC to 120V AC). They are less expensive, more widely available, and have a longer track record. However, running them off-grid requires a large inverter (2000W+), which is inefficient (10-15% energy loss in conversion) and expensive. 12V DC units (like this one) run directly on 12V DC battery power, eliminating the need for an inverter. They are more efficient for off-grid use, have variable-speed compressors for better temperature control and lower power consumption, and are quieter. However, they are more expensive upfront and require a robust 12V electrical system (large battery bank, thick wires, high-amperage breaker). For full-time off-grid living or frequent boondocking, a 12V DC unit is the better choice despite the higher upfront cost. For occasional use with shore power or a generator, a 120V AC unit is more cost-effective.
Q: Can I install this myself or do I need a professional?
A: Installation is moderately complex and requires both rooftop work and electrical work. If you are comfortable with: (1) Working on the roof, (2) Basic carpentry (cutting a roof opening if needed), (3) 12V DC electrical work (running large-gauge wires, installing a circuit breaker), (4) Following detailed instructions, then you can likely install this yourself. The most challenging parts are: (a) Lifting the 75 lb unit onto the roof (requires at least 2 people), (b) Running the large-gauge 12V wires from the battery to the roof (may require fishing wires through walls), (c) Ensuring a watertight roof seal. If you are uncomfortable with any of these, we recommend professional installation. The electrical work is particularly important — improper wiring can cause voltage drop, reduced performance, or even fire. Always follow the manufacturer’s wiring instructions and use the correct wire gauge.
Q: How does the heat pump work and when should I use it?
A: A heat pump works by reversing the refrigeration cycle. In cooling mode, the unit absorbs heat from inside the RV and releases it outside. In heating mode (heat pump), the cycle is reversed: the unit absorbs heat from the outside air and releases it inside the RV. This is much more energy-efficient than electric resistance heating because it moves heat rather than generating it. The heat pump is effective when the outside temperature is above 40°F (4°C). Below 40°F, the heat pump’s efficiency decreases significantly because there is less heat available in the outside air. Below 32°F (0°C), most heat pumps will not operate at all (or will operate very inefficiently). For temperatures below 40°F, you should use your RV’s propane furnace instead. The heat pump is ideal for: (a) Cool mornings and evenings in spring and fall (40-65°F outside), (b) Mild winter days in southern climates, (c) When you want to conserve propane and have ample battery power. It is NOT suitable for: (a) Freezing temperatures (below 32°F), (b) Extremely cold weather, (c) When battery power is limited (the heat pump still draws 35-70A).
Related Products
- Coleman Mach 15 AC Controller — Replacement controller for Coleman Mach air conditioners
- Dometic 3311924 Relay Board — Replacement relay board for Dometic Duo Therm RV AC
- Parallax 45RU Converter/Charger — 45A RV power converter and battery charger
Need help choosing the right air conditioner for your RV or camper van? Contact our technical team with your vehicle dimensions, battery setup, and climate requirements. Free shipping and duties included on all orders.
| Weight | 5 kg |
|---|
You must be logged in to post a review.


Reviews
There are no reviews yet.